
Install and Activate eSIM on iPhone

Before eSIM installation and activation
1. Ensure your device is eSIM-compatible and carrier-unlocked. Check out if your iPhone supports eSIM.
2. You must have the QR Code on another screen or device or a printed paper to scan it with your phone camera.
3. Ensure that your internet connection remains stable throughout the entire process
4. The QR code or manual installation can only be scanned ONCE.
5. DO NOT remove the eSIM from your device because it cannot be used again.
Installation with QR code

Check your email
Open your email and find the email we sent you with the QR code. If you have not received your code, contact us.

Scan the QR code
Open your camera and scan the code, or navigate to “Settings” > “Mobile Data” > “Add Data Plan” to scan the code from there.

Follow installation steps
Scan the QR code to start the installation process. Use our guide below for step-by-step configuration.
Steps to install and activate eSIM
- Paso 1: En tu dispositivo iOS, ve a Ajustes > Celular.
- Paso 2: Selecciona Agregar plan de datos/Red móvil/Agregar eSIM.
- Paso 3: Escanear el código QR del eSIM que hayas recibido.
- Paso 4: Elige el botón Agregar plan celular para guardar los detalles del eSIM.
- Paso 5: En la pantalla llamada Celular/Etiquetas de planes de datos móviles, selecciona la etiqueta disponible (como Secundario, Negocios, Viaje, etc.) o Etiqueta tu perfil eSIM como quieras (por ej. China eSIM) y toca Continuar.
- Paso 6: Configura tu perfil eSIM como la Línea predeterminada (si tu eSIM de datos viene con número de teléfono) o selecciona tu Número principal si tu eSIM de datos no viene con número de teléfono, luego elige Continuar.
- Paso 7: Configura tu perfil eSIM como los Datos celulares predeterminados > elige Listo.
- Paso 8: Activa la función Roaming de datos para comenzar a usar tu eSIM. (Te recomendamos hacer esto cuando llegues a tu destino).
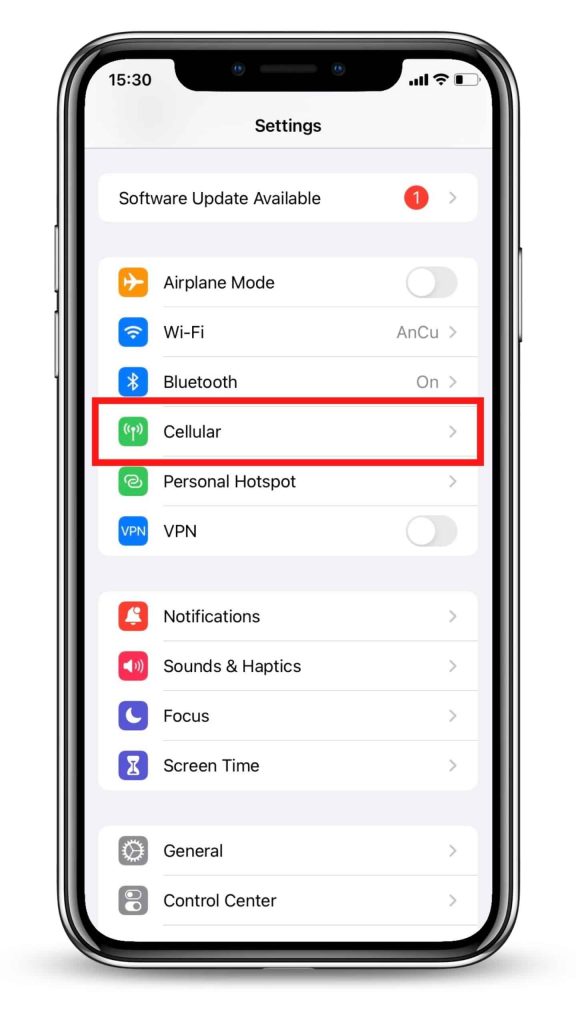
Step 1: Settings > Cellular

Step 2: Add Cellular Plan/ eSIM
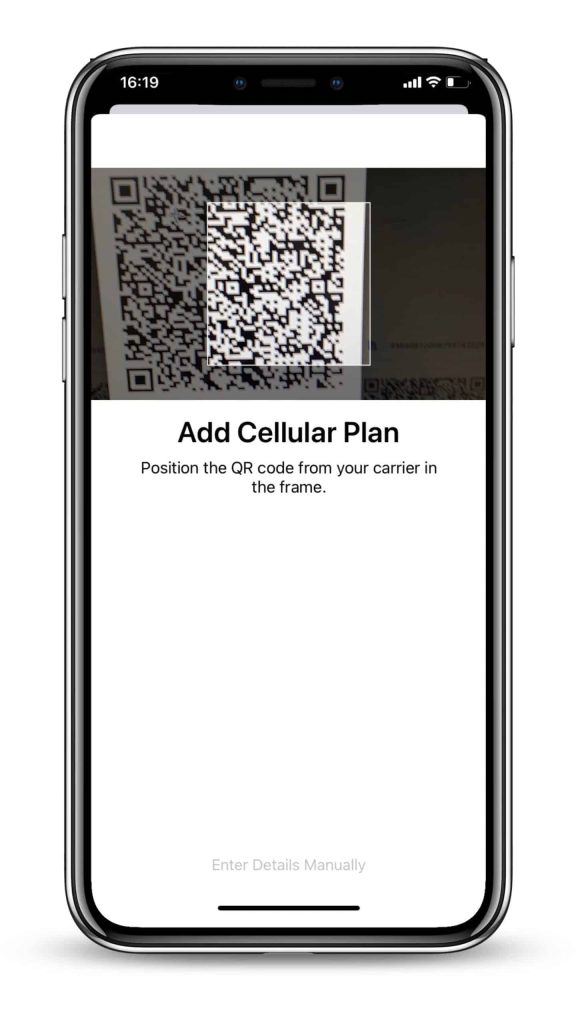
Step 3: Scan eSIM QR code
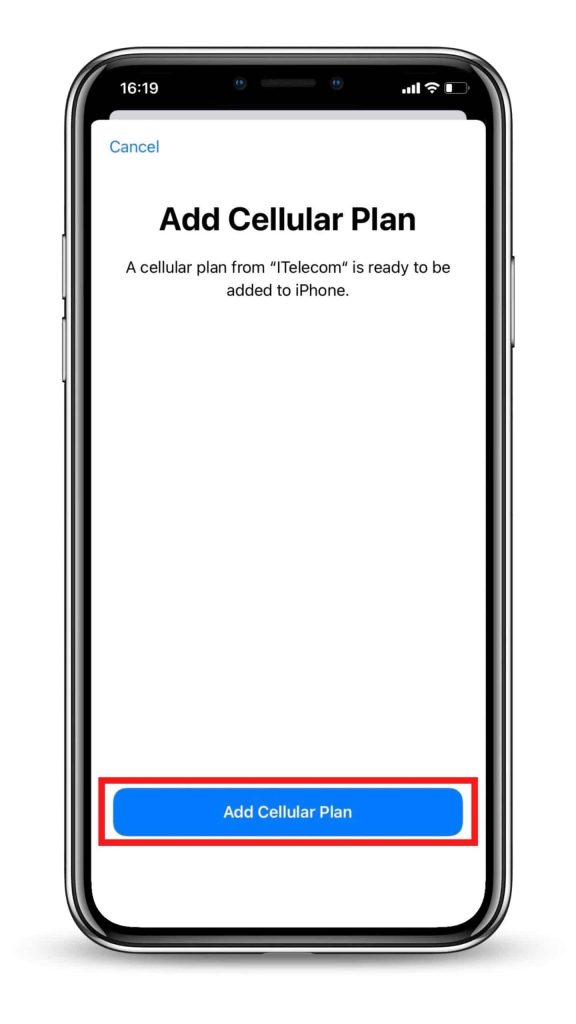
Step 4: Add Cellular Plan
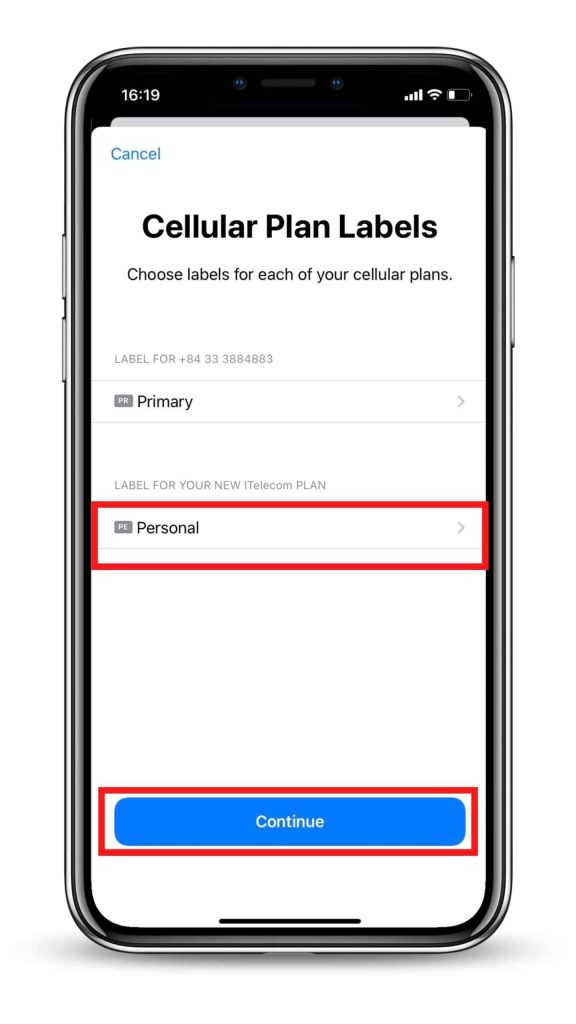
Step 5: Label your eSIM profile
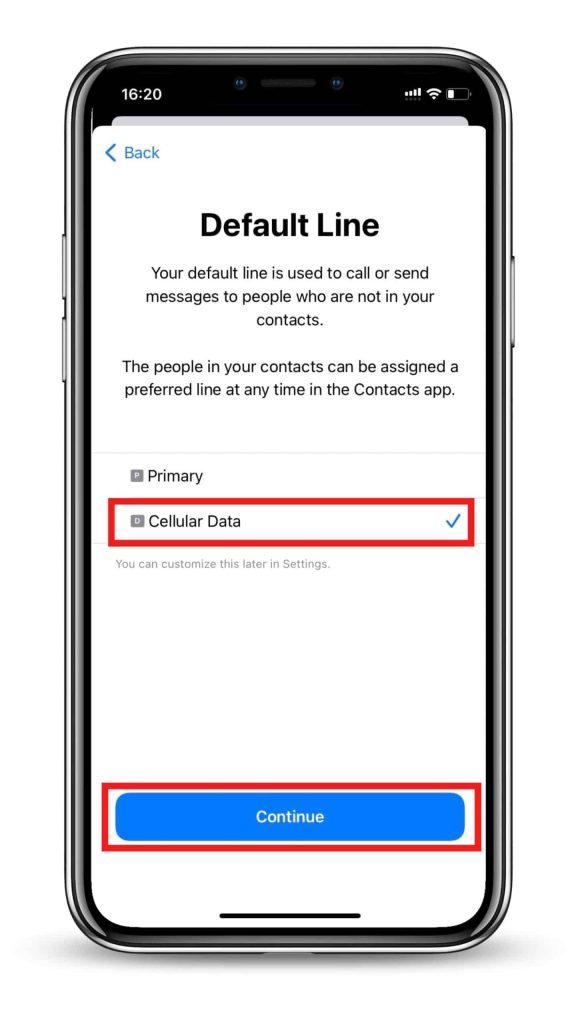
Step 6: Set up your Default Line

Step 7: Set your eSIM as the default Cellular Data

Step 8: Turn on eSIM's Data Roaming
* Notes: Detailed guides for each eSIM plan will be sent in the email after purchasing.
Install manually
Check your email
Open your email and find the email we sent you with the SM-DP+ address and activation code. If you have not received your code, contact us.
Scan the QR code
Open your camera and scan the code, or navigate to “Settings” > “Mobile Data” > “Add Data Plan” > “Scan QR code” > “Enter activation details manually”
Follow installation steps
Enter the SM-DP+ address and activation code to start the installation process. Use our guide below for step-by-step configuration.
Steps to install eSIM manually
- Step 1: On your iOS device, go to Settings > Cellular.
- Step 2: Select Add Data/Cellular Plan.
- Step 3: If you cannot scan the QR code sent by your eSIM provider due to a certain reason, you can still activate your eSIM manually by selecting Enter Details Manually.
- Step 4: Enter the required information including
- SM-DP+ Address
- Activation Code
- Confirmation Code (if required)
- Then, select Next.
- Step 5: On the screen named Cellular/Mobile Data Plan Labels, select the available label (like Secondary, Business, Travel,… ) or Label your eSIM profile as you want (i.e. China eSIM), and tap Continue.
- Step 6: Set your eSIM profile as the Default Line (if your data eSIM comes with a phone number) or select your Primary number if your data eSIM does not come with a phone number), then choose Continue.
- Step 7: Set your eSIM profile as the default Cellular Data > select Done. Switch off the Allow Cellular Data Switching to avoid roaming charges.
- Step 8: Turn on Data Roaming to start using your eSIM.
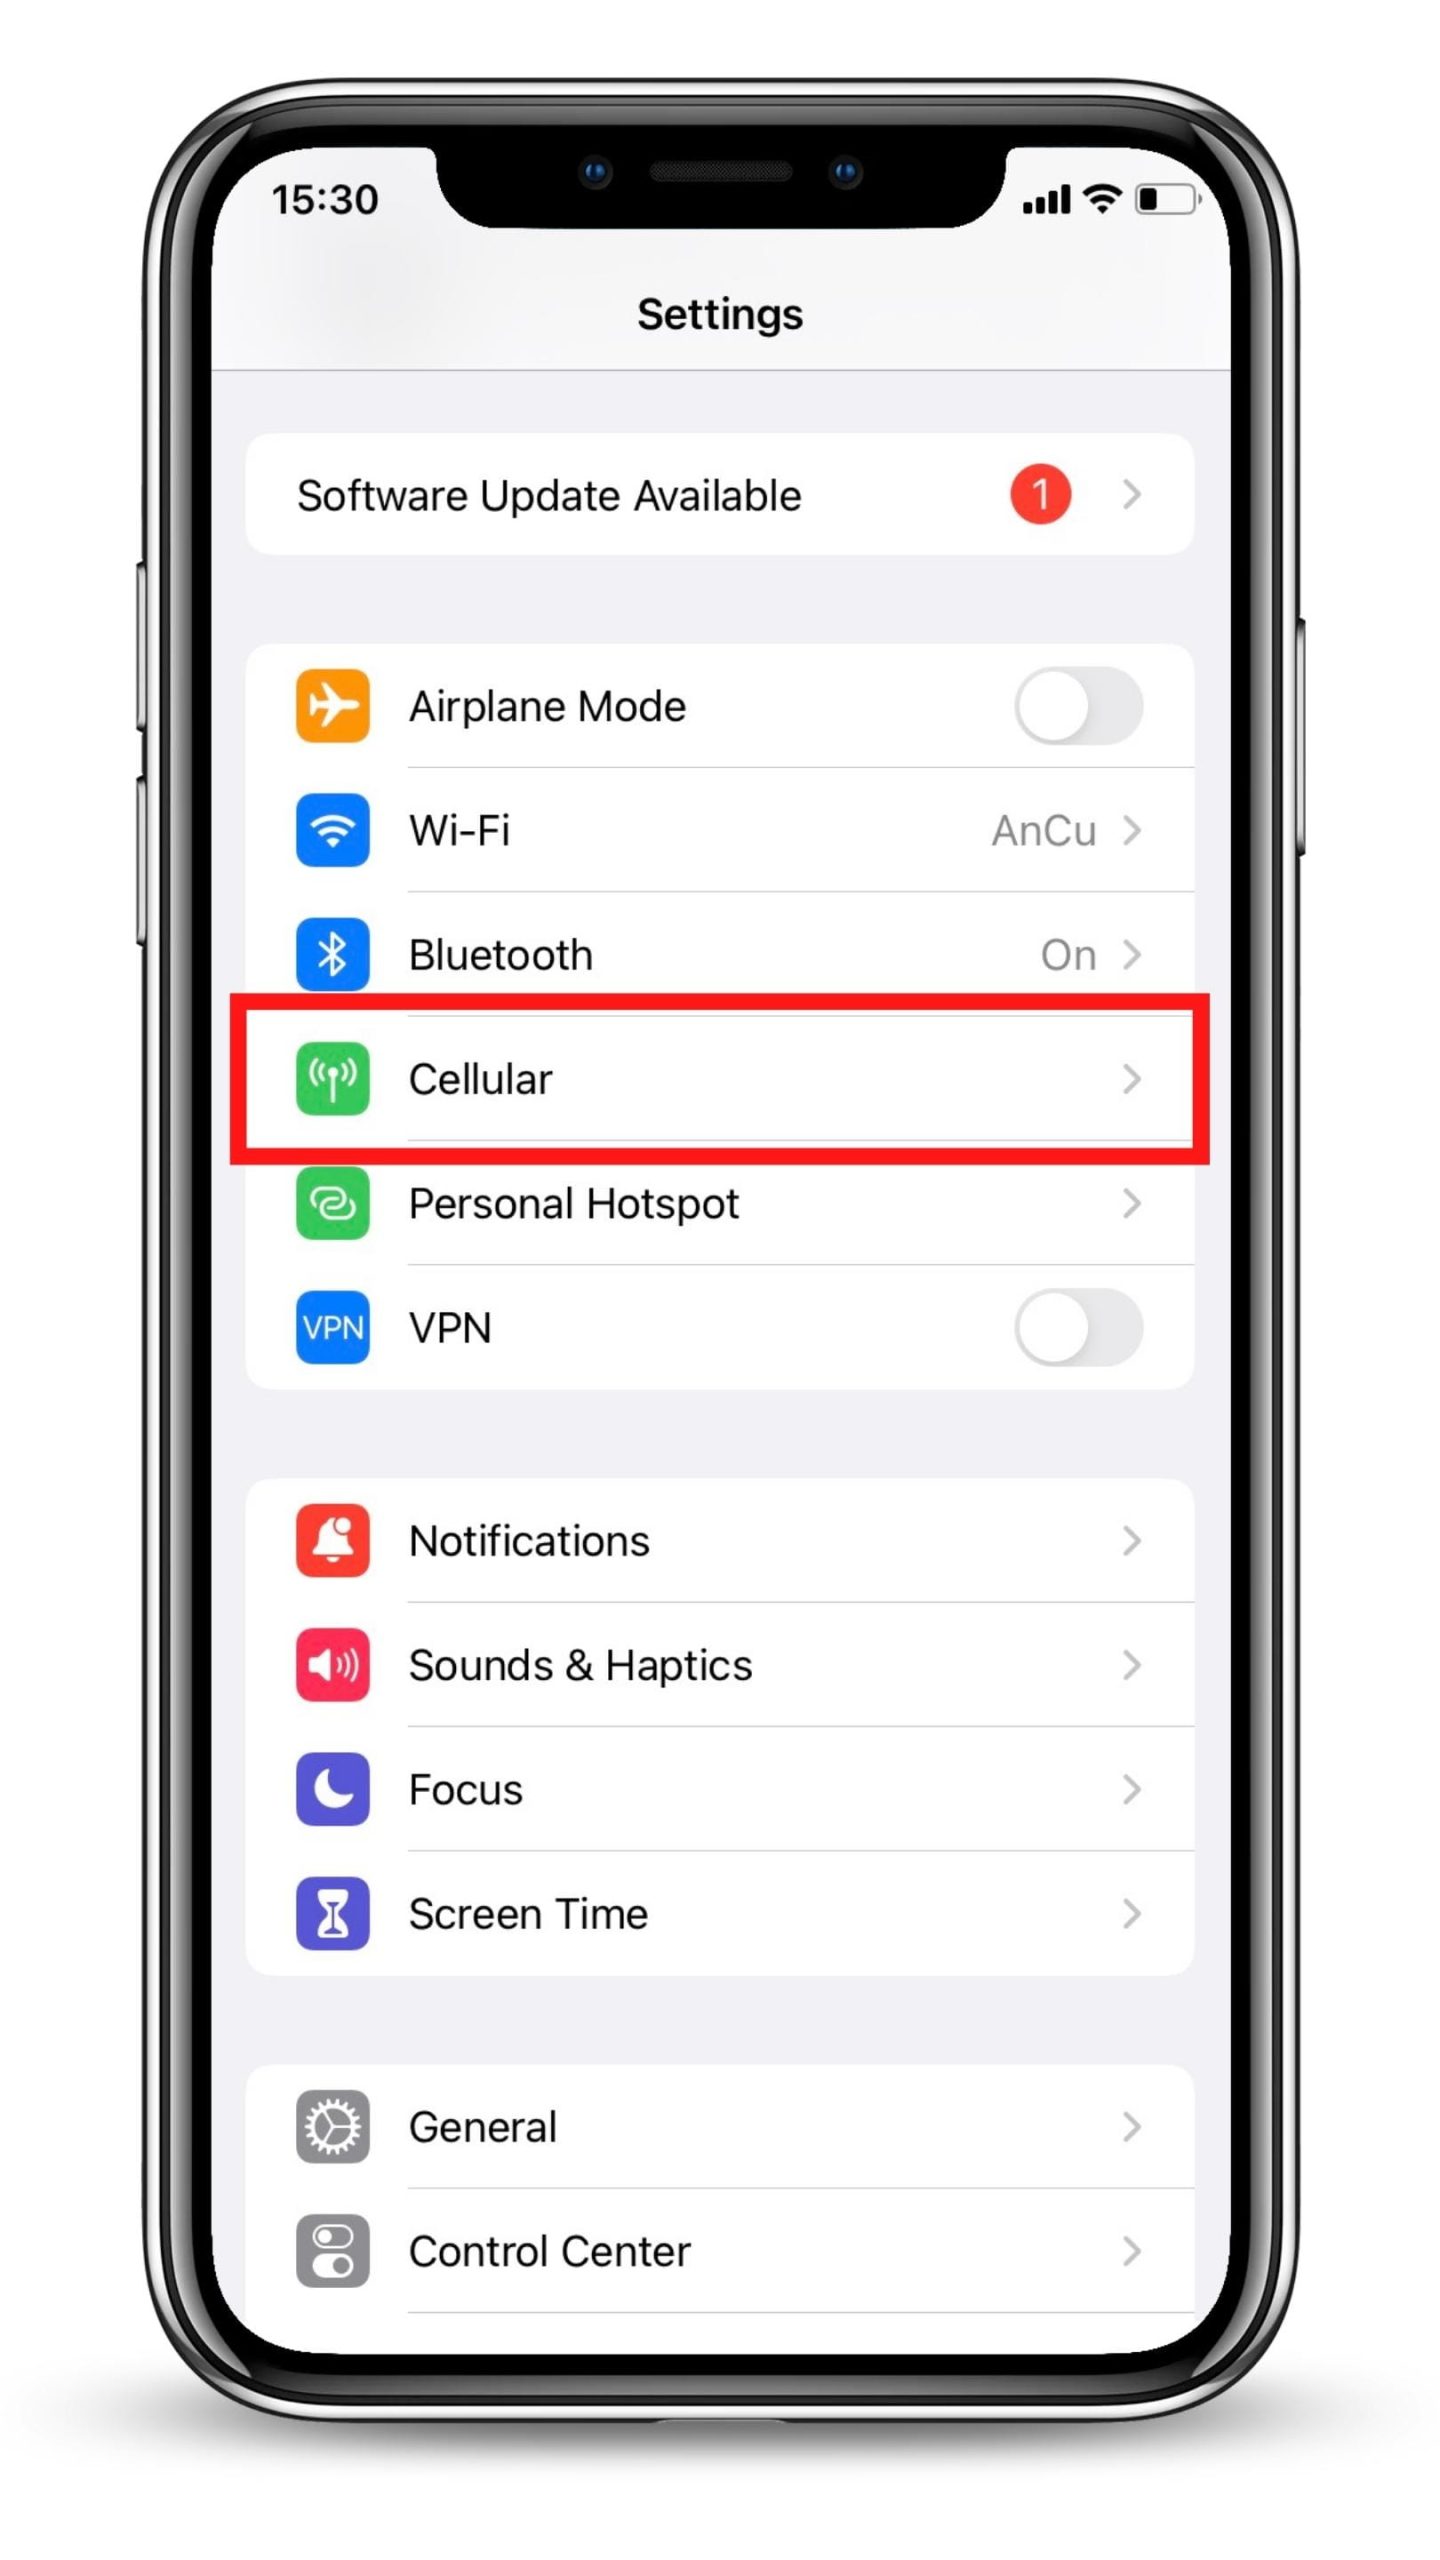
Step 1: Settings > Cellular
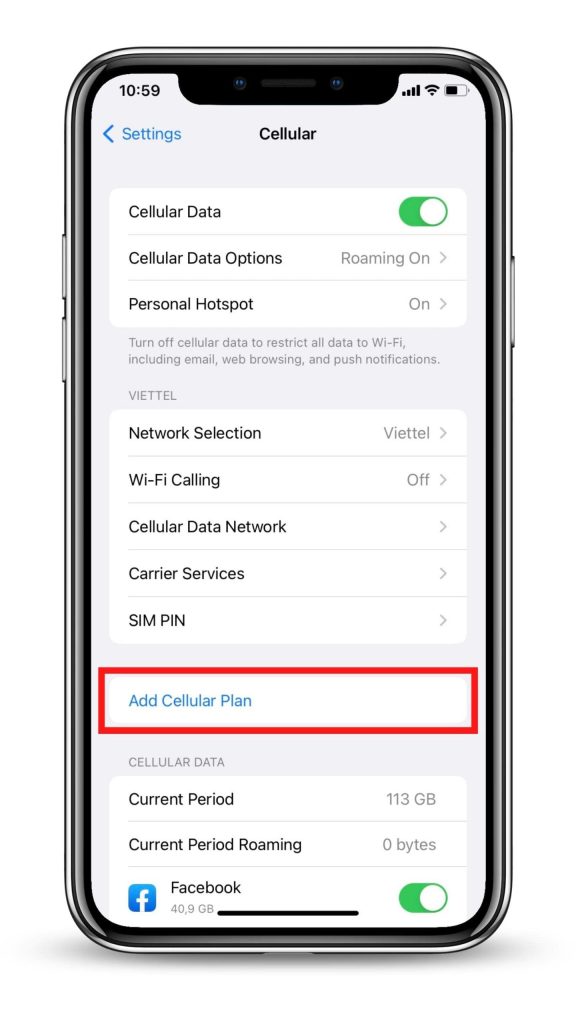
Step 2: Add Data/Cellular Plan/ Add eSIM
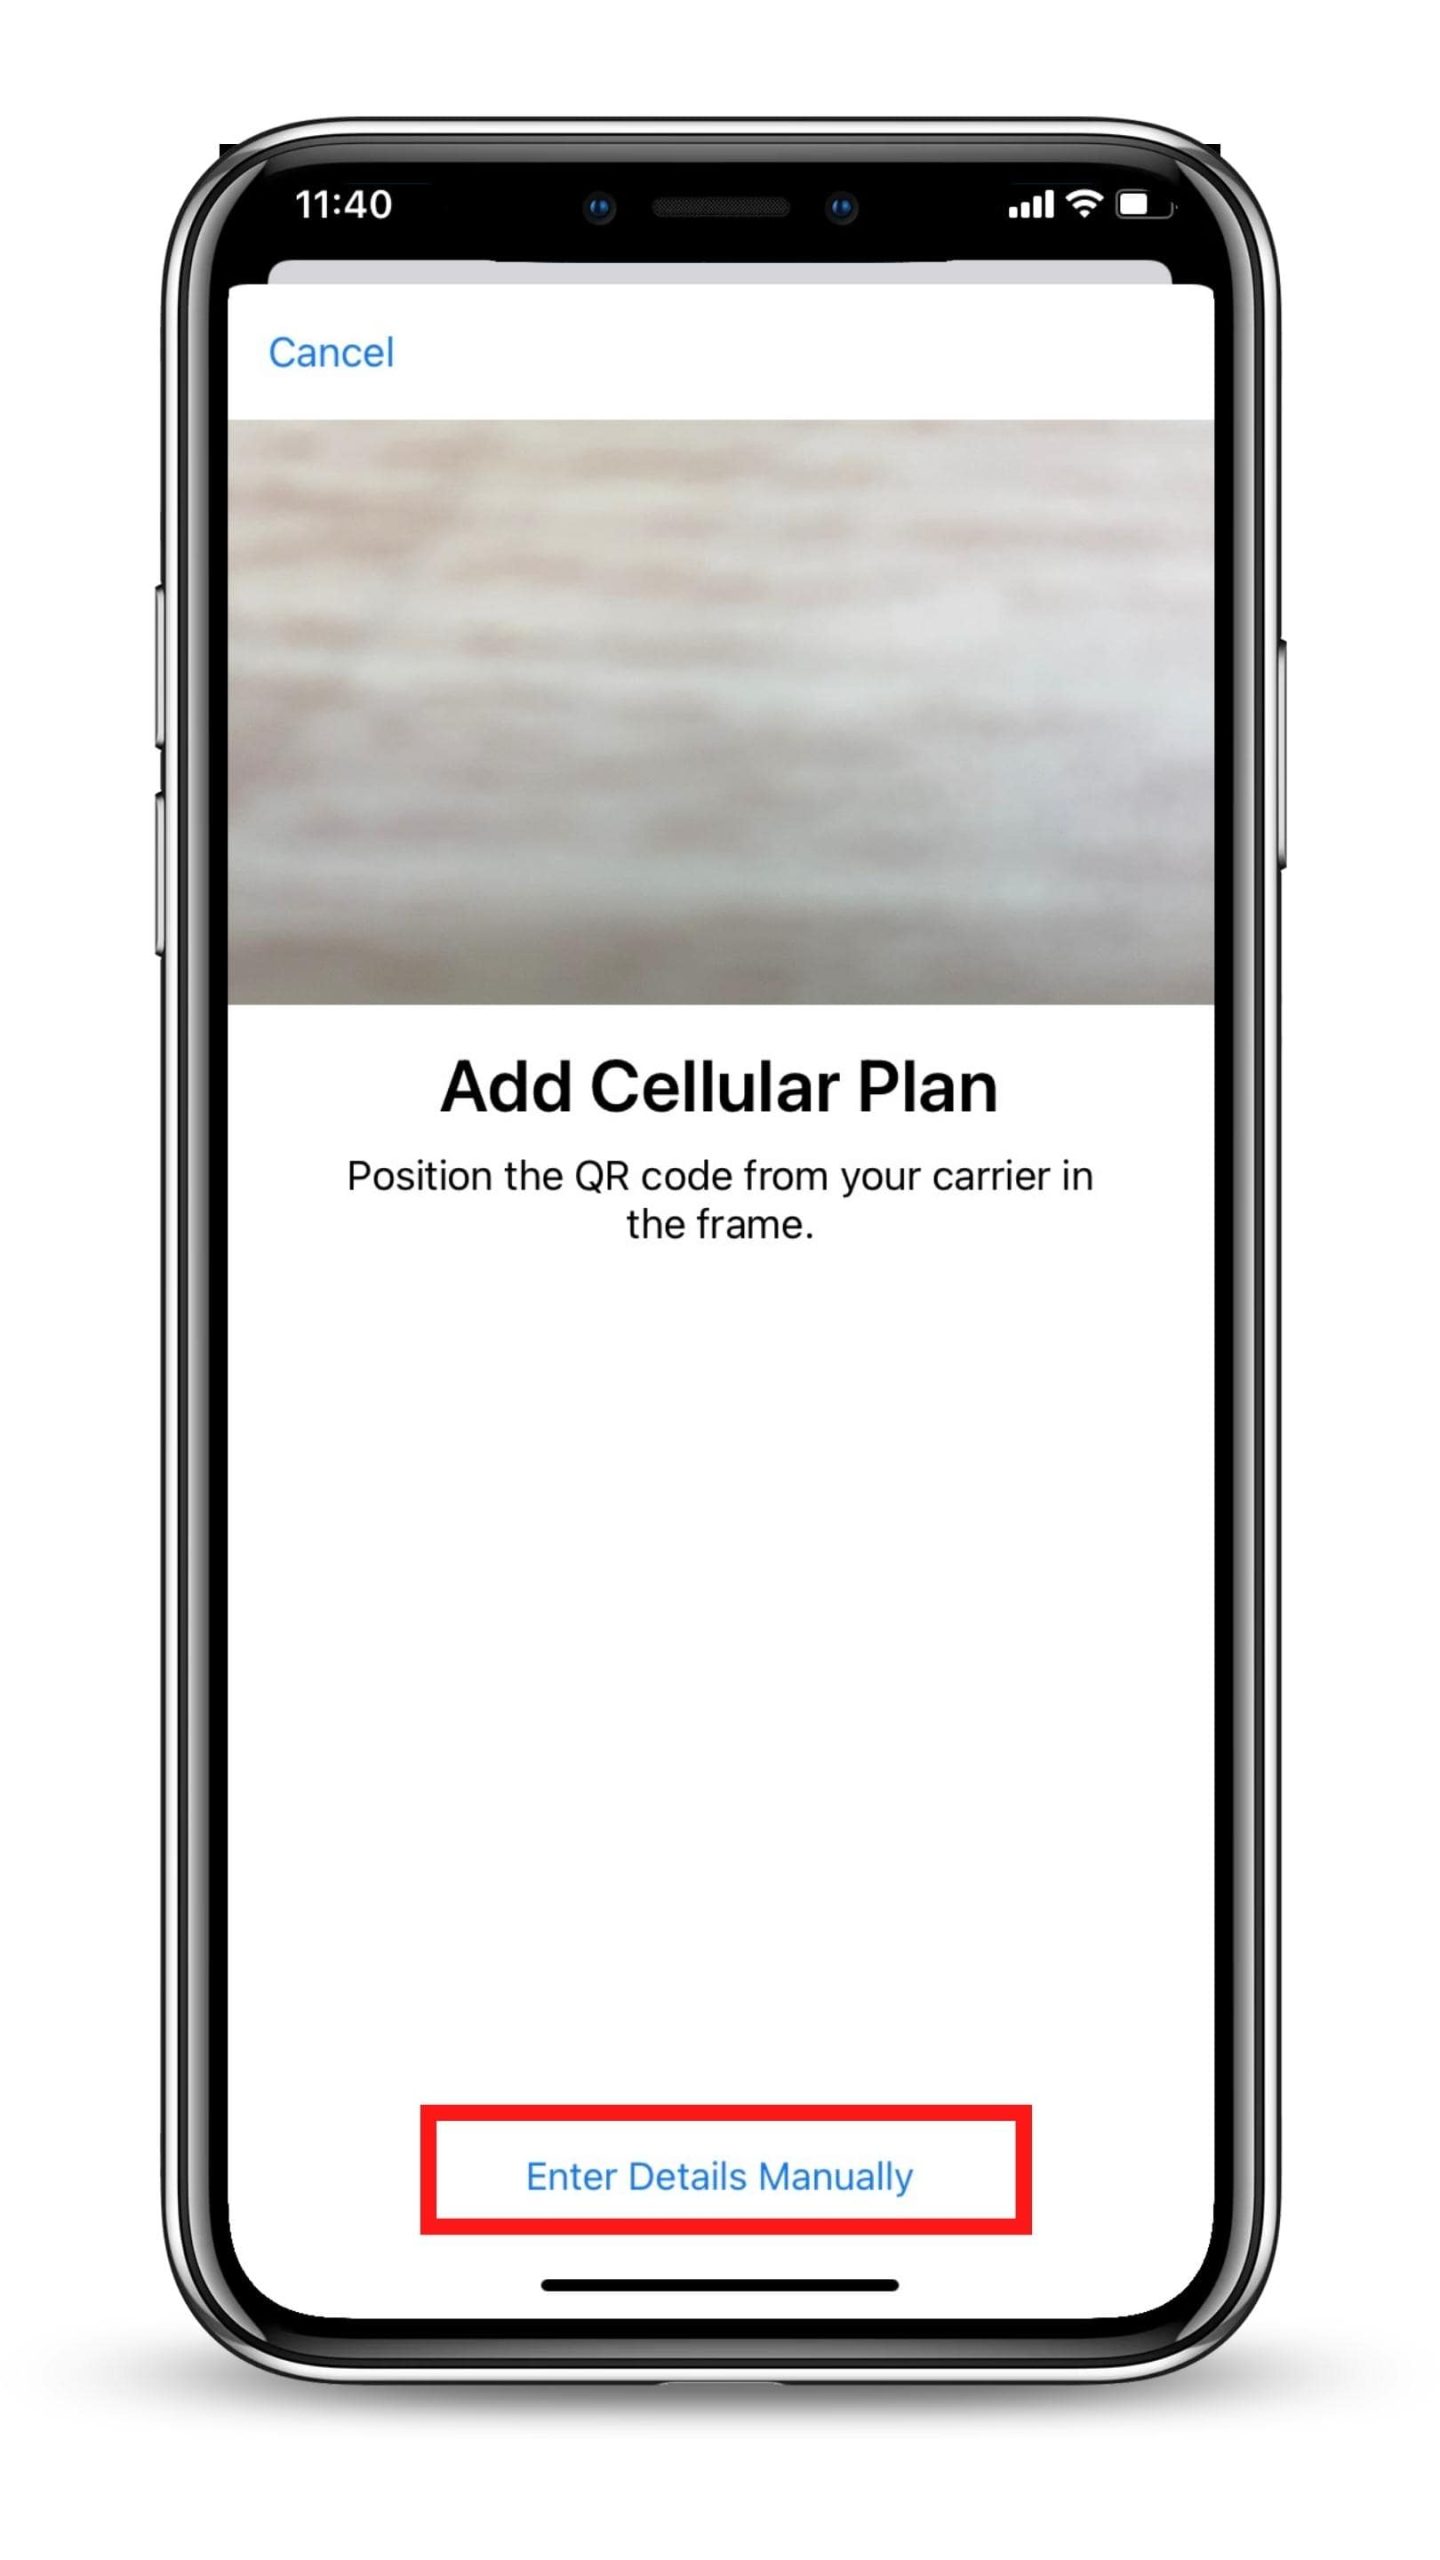
Step 3: Enter Details Manually
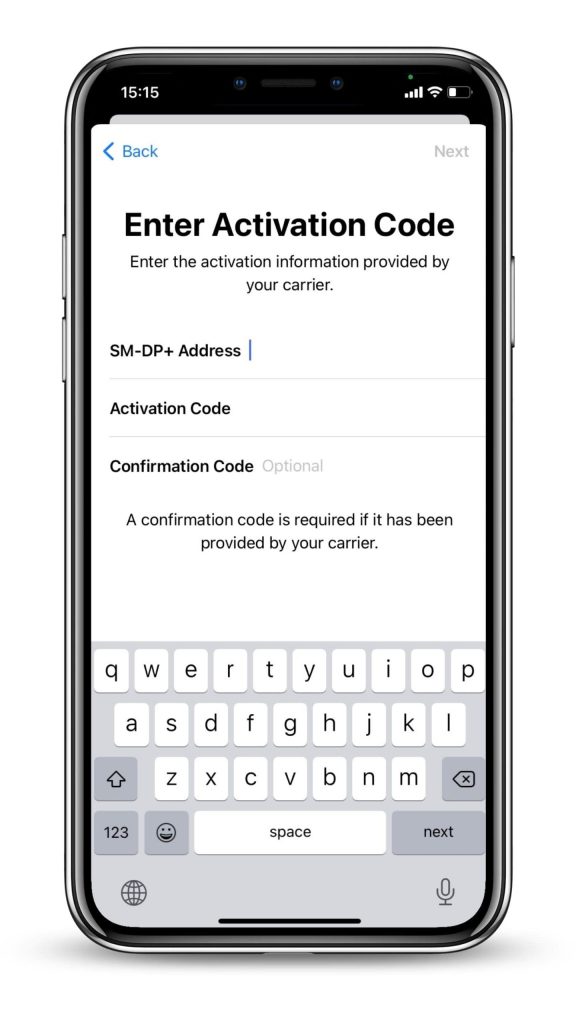
Step 4: Enter manual information
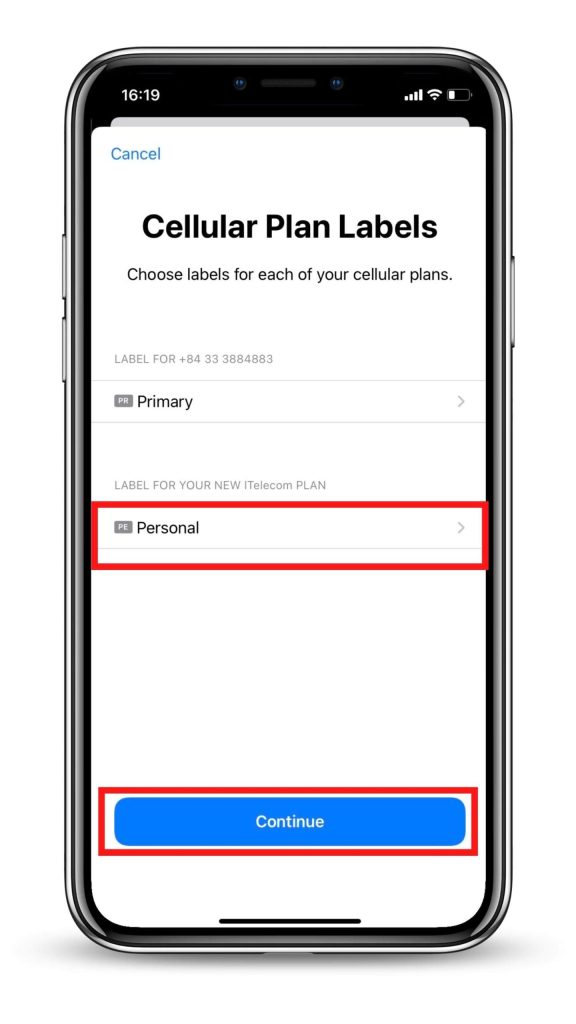
Step 5: Label your eSIM profile
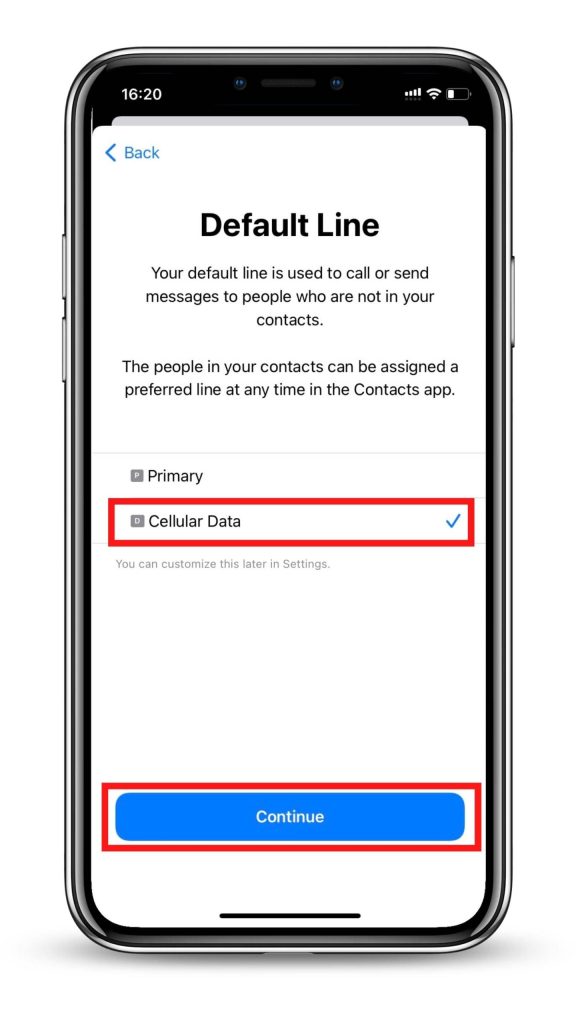
Step 6: Set up Default Line
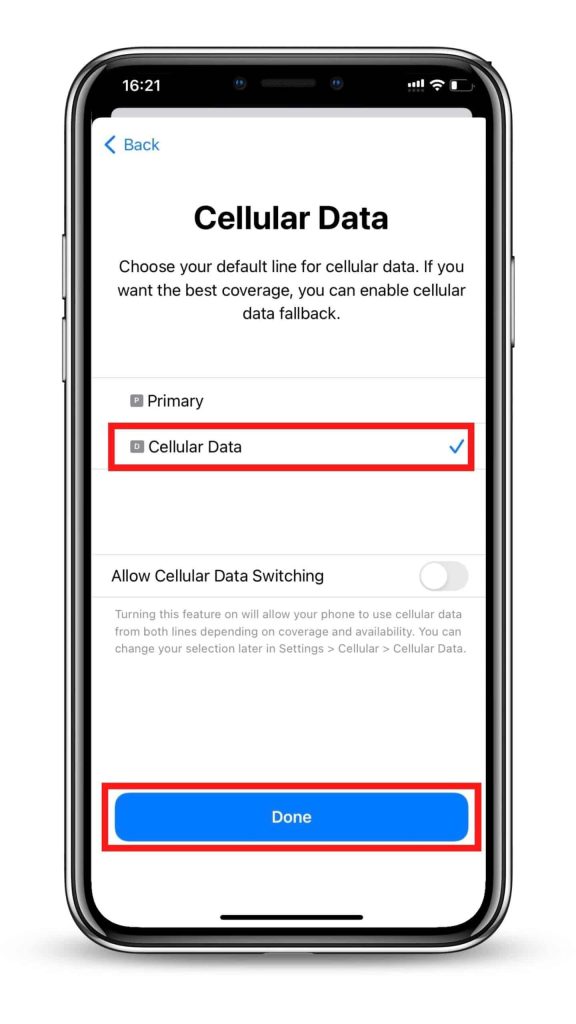
Step 7: Set your eSIM as Default Cellular
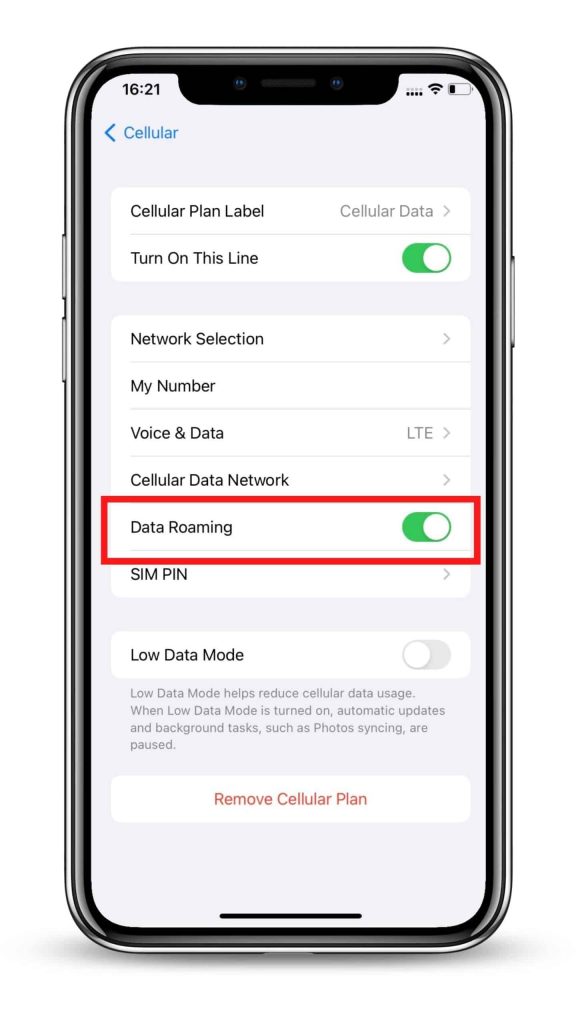
Step 8: Turn on Data Roaming
* Notes: Detailed guides for each eSIM plan will be sent in the email after purchasing.
Cómo usar la eSIM china para iPhone
After installation, to turn on eSIM on iPhone when landing in China eSIM, you need:
- Step 1: Go to Settings, and tap Cellular/Mobile Data (depending on your device)
- Step 2: Choose your eSIM (under “Cellular Plans”) and switch on both the Turn On This Line (open Settings > Mobile/Cellular Data) and Data Roaming (open Settings > Mobile/Cellular Data > Mobile Data Options).
![]() Congratulations! Your plan has now been installed and is ready to use.
Congratulations! Your plan has now been installed and is ready to use.
Frequently asked questions
How do you know your eSIM is active?
Puede utilizar 2 formas siguientes para comprobarlo:
1. Asegúrate de que hay al menos una barra en el icono de señal de tu iPhone.
2. Ve a “Ajustes” en tu iPhone, selecciona “Datos móviles”, haz clic en la opción que has etiquetado antes y comprueba que “Itinerancia de datos” está activada.
How to remove an eSIM on iPhone?
You might need to erase your eSIM if:
- You transferred the eSIM’s phone number to another iPhone.
- You’re going to sell, exchange, or donate your device.
Don’t erase your eSIM as a troubleshooting step, contact us if you need support when having problems with your eSIM.
If you erase your eSIM, you’ll need a new one. Then set up your new eSIM.
Now let’s check out how to remove an eSIM from your device:
- Step 1: Go to Settings > Cellular.
- Step 2: Select the plan you want to remove.
- Step 3: Select Remove Cellular Plan. Then, confirm your selection.
What to do if I can't connect to the Internet after eSIM setup?
En caso de que no puedas conectarte a Internet, por favor ajusta el APN (nombre de punto de acceso) de tu teléfono:
- Paso 1: Ve a Ajustes
- Paso 2: Toca Celular o Datos móviles (según tu dispositivo)
- Paso 3: Selecciona tu eSIM que tiene habilitadas las opciones “Activar esta línea” y Roaming de datos
- Paso 4: Toca Red de datos celulares o Red de datos móviles (según tu teléfono)
- Paso 5: Introduce el valor enviado por tu proveedor de eSIM (p.ej. ctm-mobile) en todos los campos APN (Datos celulares/móviles y Punto de acceso personal) o un valor diferente si usas eSIM de otro proveedor. Los otros campos se dejan en blanco.
¿Cuántas veces puedo configurar la eSIM en mi iPhone?
Puedes almacenar múltiples eSIM en tu iPhone, pero solo una puede estar activada simultáneamente.
Si quieres cambiar el eSIM, sigue estos pasos:
- Abre Ajustes > Datos celulares/móviles (según tu teléfono).
- Elije el eSIM que quieres usar (en el campo “Planes celulares”).
- Toca “Activar esta línea”.
How can I install eSIM on iPhone 14?
You might need to erase your eSIM if:
- You transferred the eSIM’s phone number to another iPhone.
- You’re going to sell, exchange, or donate your device.
Don’t erase your eSIM as a troubleshooting step, contact China eSIM if you need support when having problems with your eSIM.
If you erase your eSIM, you’ll need a new one. Then set up your new eSIM.
Now let’s check out how to remove an eSIM from your device:
- Step 1: Go to Settings > Cellular.
- Step 2: Select the plan you want to remove.
- Step 3: Select Remove Cellular Plan. Then, confirm your selection.
¿Cuántos perfiles eSIM puedo tener en un iPhone?
Aunque puedes tener varios perfiles de eSIM en un iPhone (hasta 20), se recomienda instalar 3-4 eSIM en cada dispositivo. Sin embargo, solo habrá un perfil eSIM activo.
¿Puedo utilizar la eSIM como doble SIM en mi iPhone?
Los iPhone a partir de los modelos XS y los más recientes tienen funciones de doble SIM con una eSIM y una tarjeta SIM física.